Updated: December 2020

Overview:

With a global app market, it only makes sense to develop apps that operate in native languages with cultural sensitivity. Apple has provided developers with a rich set of tools, features, and functionality to support well over a hundred different world languages.

At first, the problem seems simple – just replace the text with a language-specific version. Instead of defining the text that gets displayed as hard-coded strings within the software, the text for each language/region is defined in a separate strings file. A language-specific strings file within each app is selected (if the app supports language localization) by setting the language for the iPhone or iPad device in the device ‘Language & Region’ option under ‘General’ within ‘Settings’.

Even with all the support structure that is in place, providing a native language and an engaging cultural app experience is amazingly complex with a mind-numbing set of details to consider and resolve:

  • Singularity and plurality of things
  • Dates and calendars
  • Currency symbols and formatting
  • Numbers and formats
  • Alphabets and punctuation
  • Reading direction
  • Gender assignment to things
  • Sorting a list
  • Keyboards

And, that doesn’t even begin to consider the accuracy of translations and relevant context. Some of the complexity of getting localization and internationalization correct is humorously presented by Tom Scott in the following video.

Tips and Best Practices:

I am using the following design guidelines and practices to enable localization and globalization for apps. Many of these guidelines and practices are not my own, but a collection of best practices from the developer community.

  • Even if just a single language is used for the app, setting up the files for localization and internationalization code consolidates the text strings in a few files. This is so much easier than searching through all the code files to find a text string to edit.
  • Start with the localization and internationalization code and the configuration setup from the start. It is so much harder to retrofit an app design and the software code.
  • Use localized string dictionary files for handling singular and plural phrases. Various languages implement singular and plural differently in phrases.
  • Use flexible sizing of localized fields since the text length will vary between languages.
  • Localize the title of the app that displays under the icon.
  • Use NSDateFormatter when displaying dates. Use NSNumberFormatter when displaying numbers. Pass NSLocale currentLocale into NSDateFormatter and NSNumberFormatter.
  • Use a naming convention approach. With a large number of individual items in an app to be converted to various languages, it is crucial to develop at the start a naming convention that will be consistent throughout the software code. For example:
NSLocalizedString("aboutscreen.title.welcome", comment: "comment about context")

Configuring for Localization and Internationalization:

Project configuration to support localization and internationalization for the mobile device family (iPhone, iPad) and the Mac are slightly different. As such, each are separately described.

There are five sets of language-specific files (‘Info.plist’, ‘Localizable.strings’, ‘InfoPlist.strings’, ‘Localizable.stringsdict’, and ‘LaunchScreen.storyboard’) to configure for localization and internationalization within Xcode for iOS and iPadOS apps.

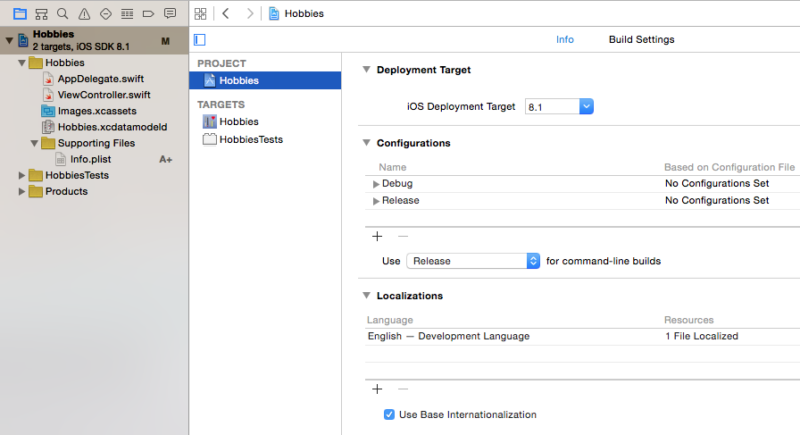
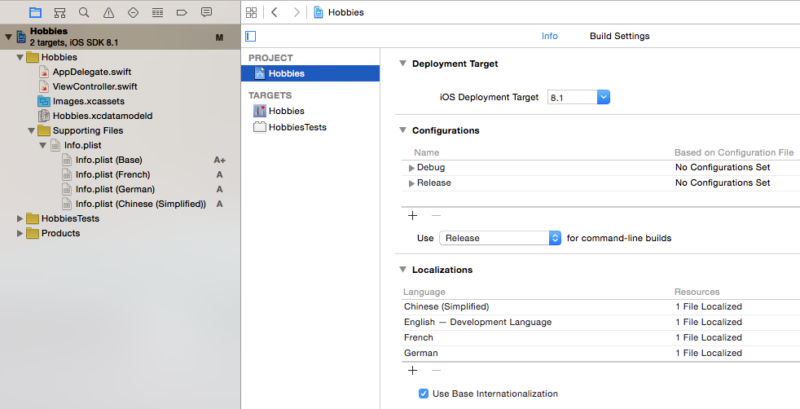
First set of files (language-specific ‘Info.plist’):

  • Click on ‘Info.plist’ file located in the Project Navigator pane which will show its contents in the Editor Pane. Within the Utility pane, click on ‘Localize…’ button. Xcode prompts with a question about localization. Select ‘Base’ and click on ‘Localize’.
  • To add languages and regions to the project, select the project (e.g., Hobbies) in the Project Navigator pane, then select ‘Project’ in the Editor pane as shown below. Within the ‘Localizations’ section under the ‘Info’ tab, verify that ‘Use Base Internationalization’ is checked and select ‘+’ for adding new languages.
localize_01
  • An initial list of 33 languages is shown when the ‘+’ button is selected. At the bottom of this list is the option ‘Other’ to display over a hundred more language/region options. It is absolutely amazing in extent – pick a language, any language! Then, click on ‘Finish’ to add the language. Note that a localized ‘info.plist’ will be added under ‘Info.plist’ in the Project Navigator pane. Repeat this step to configure the project for additional languages.
localize_02
  • Initially, I added French, German, and Chinese to the localized languages for this prototype app for test purposes only. I know a little French, the German language is a good test for autolayout, and Chinese is a good choice for testing the app with a symbol-based language. The intent is that all apps deployed by Champlin Technologies LLC support many languages.

Second set of files (language-specific ‘Localizable.strings’):

  • At this point, a second set of files, known as ‘Localizable.strings’, is created for the project. Each of these files contains the translated strings for one of the localized languages. From File > New > File, select the Resource category under iOS and select the File >’Strings File’ and click ‘Next’. Name the file File >’Localizable.strings’, select File >’Supporting Files’ location from File >’Group’, and click on File >’Create’.
  • The resulting File >’Localizable.strings’ file is placed under File >’Supporting Files’ in the Project Navigator pane. Before localizing this file for the other project languages, I added a representative line for translated text as shown.
localize_03

  • Clicking the Localize… button at this point creates the additional ‘Localizable.strings’ files for the other selected languages. Xcode prompts with a question about localization. Select ‘Base’ or possibly, ‘English’, and click on ‘Localize’. A checkbox for each of the localized languages now appears within the Localization section in the Utilities pane. As each checkbox is checked, another ‘Localizable.strings’ file is created as shown.
localize_04

  • For each language, select the appropriate ‘Localizable.strings’ file and replace the base text with the translations. For the representative example for this tutorial, the “Welcome!” message is replaced with the translated version in each of the ‘Localizable.strings’ files, respectively.
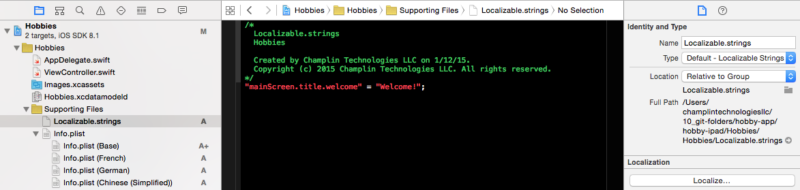
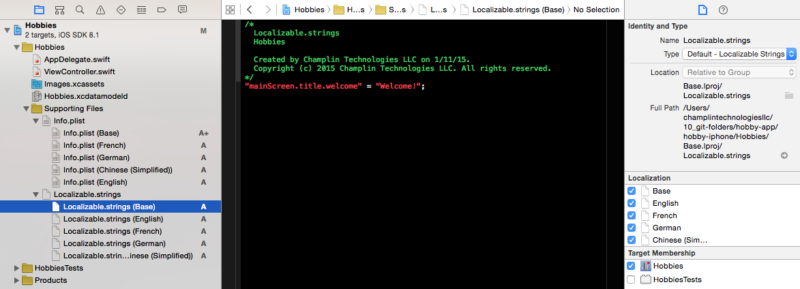
"mainscreen.title.welcome" = "Welcome!";
"mainscreen.title.welcome" = "Bienvenue!";
"mainscreen.title.welcome" = "Herzlich Willkommen!";
"mainscreen.title.welcome" = "欢迎";

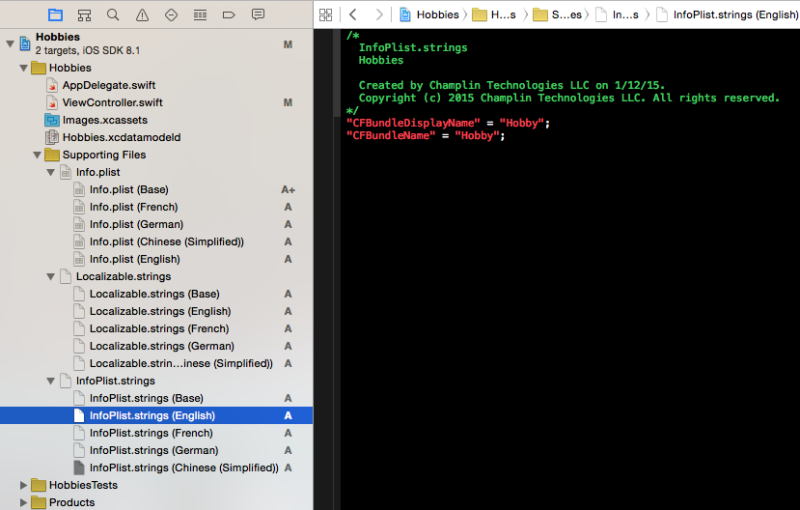
Third set of files (language-specific ‘InfoPlist.strings’):

  • A third set of files, known as ‘InfoPlist.strings’, is created for the project. Each of these files contains the translated strings that are used for the app title that appears under the app icon on the iPhone or iPad home screen. From File > New > File, select the Resource category under iOS and select the ‘Strings File’ and click ‘Next’. Name the file ‘InfoPlist.strings’, select File >’Supporting Files’ location from File >’Group’, and click on File >’Create’.
  • The resulting ‘infoPlist.strings’ file is placed under File >’Supporting Files’ in the Project Navigator pane. Before localizing this file for the other project languages, I added the two lines for providing localized app titles as shown.
"CFBundleDisplayName" = "Hobby";
"CFBundleName" = "Hobby";
  • Clicking the Localize… button at this point creates the additional ‘InfoPlist.strings’ files for the other selected languages. Xcode prompts with a question about localization. Select ‘Base’ and click on ‘Localize’. A checkbox for each of the localized languages now appears within the File >’Localization’ section in the Utilities pane. As each checkbox is checked, another ‘InfoPlist.strings’ file is created as shown.

localize_05

  • For each language, select the appropriate ‘InfoPlist.strings’ file and replace the base text with the translations.

Fourth set of files (language-specific ‘Localizable.stringsdict’):

  • A fourth set of files, known as ‘Localizable.stringsdict’, is created for the project. Each of these files contains the translated strings and algorithm to handle such things as complicated singular and plural variations in each language. From File > New > File, select the Resource category under iOS and select the ‘Stringsdict File’ and click ‘Next’. Name the file ‘Localizable.stringsdict’, select File >’Supporting Files’ location from File >’Group’, and click on File >’Create’.
  • The resulting ‘Localizable.stringsdict’ file is placed under File >’Supporting Files’ in the Project Navigator pane.
  • Clicking the Localize… button at this point creates the additional ‘Localizable.stringsdict’ files for the other selected languages. Xcode prompts with a question about localization. Select ‘Base’ and click on ‘Localize’. A checkbox for each of the localized languages now appears within the File >’Localization’ section in the Utilities pane. As each checkbox is checked, another ‘Localizable.stringsdict’ file is created.
  • For each language, select the appropriate ‘Localizable.stringsdict’ file and add the needed algorithm-based translations.

Fifth set of files (language-specific ‘LaunchScreen.storyboard’):

  • A fifth set of files, known as ‘LaunchScreen.storyboard’, is created for the project. Each of these files contains the language-specific launch screen for the app which may include language/cultural specific images and text.
  • Clicking the Localize… button at this point creates the additional ‘LaunchScreen.storyboard’ files for the other selected languages. A checkbox for each of the localized languages appears within the File >’Localization’ section in the Utilities pane. As each checkbox is checked, another ‘LaunchScreen.strings’ file is created once the base ‘LaunchScreen.storyboard’ file has been created.
  • For each language, select the appropriate ‘LaunchScreen.storyboard’ file and add the necessary elements (image, text) to the storyboard.

Creating the localized strings:

After support for localization and internationalization has been configured for a Xcode project, the NSLocalizedString method provides the basic interface for text strings that are translated by the text in the ‘Localizable.strings’ file. An example NSLocalizedString method is shown below:

title = NSLocalizedString("mainscreen.title.welcome", comment: "welcome message on initial main screen")

In source code, each of the calls to a localized string can be refactored by adding an extension. Create a new file (e.g., ‘+Strings.swift’) for the project and add the following code:

extension String {
    var localized: String {
        return NSLocalizedString(self, comment: "")
    }
    func localized(comment: String = "") -> String {
        return NSLocalizedString(self, comment: comment)
    }
}

Now, a call for a localized string can be written in one of two easy-to-read forms depending on whether there is a comment:

title = "mainscreen.title.welcome".localized
subtitle = "mainscreen.subtitle.hobby".localized("name of app")
For the Mac, there are six sets of language specific files (‘Info.plist’, ‘MainMenu.strings’, ‘Localizable.strings’, ‘InfoPlist.strings’, ‘Localizable.stringsdict’, and ‘Main.storyboard’) to configure an Xcode project for localization and internationalization. The extra set of files are associated with the ‘MainMenu.xib’ file.

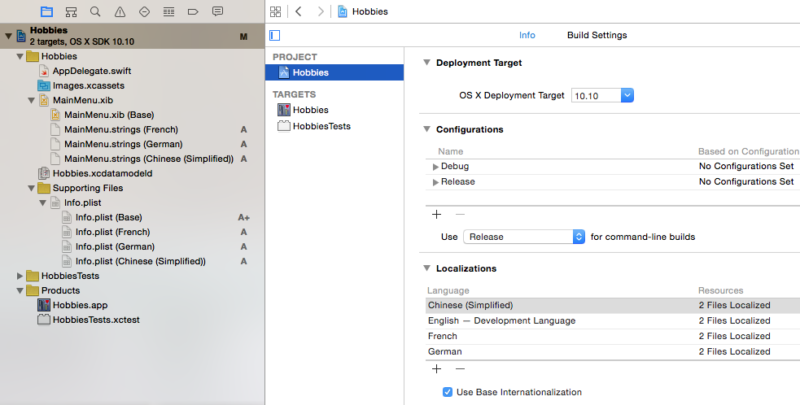
First two sets of files (language-specific ‘Info.plist’ and ‘MainMenu.strings’):

  • Click on Info.plist file located in the Project Navigator pane which will show its contents in the Editor Pane. Within the Utility pane, click on ‘Localize…’ button. Xcode prompts with a question about localization. Select ‘Base’ and click on ‘Localize’.
  • To add languages and regions to the project, select the project (e.g., Hobbies) in the Project Navigator pane, then select ‘Project’ in the Editor pane as shown below. Within the ‘Localizations’ section under the ‘Info’ tab, verify that ‘Use Base Internationalization’ is checked and select ‘+’ for adding new languages.
  • An initial list of 33 languages is shown when the ‘+’ button is selected. At the bottom of this list is the option ‘Other’ to display over a hundred more language/region options. After selecting a language, click on ‘Finish’ to add the language. Note that a localized ‘Info.plist’ file and a localized ‘MainMenu.strings’ file is added in the Project Navigator pane. Repeat this step to configure the project for additional languages.
localize_06

Third set of files (language-specific ‘Localizable.strings’):

These files are created in the same manner as for the iOS app.

Fourth set of files (language-specific ‘InfoPlist.strings’):

These files are created in the same manner as for the iOS app.

Fifth set of files (language-specific ‘Localizable.stringsdict’):

These files are created in the same manner as for the iOS app.

Sixth set of files (language-specific ‘Main.storyboard’):

  • A sixth set of files, known as ‘Main.storyboard’, is created for the project. Each of these files contains the language-specific main screen for the app which may include language/cultural specific images and text.
  • Clicking the Localize… button at this point creates the additional ‘Main.storyboard’ files for the other selected languages. A checkbox for each of the localized languages appears within the File >’Localization’ section in the Utilities pane. As each checkbox is checked, another ‘Main.strings’ file is created once the base ‘Main.storyboard’ file has been created.
  • For each language, select the appropriate ‘Main.storyboard’ or ‘Main.strings’ file and add the necessary elements (image, text).

Creating the localized strings:

After support for localization and internationalization has been configured for a Xcode project, the NSLocalizedString method provides the basic interface for text strings that are translated by the text in the ‘Localizable.strings’ file. An example NSLocalizedString method is shown below:

title = NSLocalizedString("mainwindow.title.welcome", comment: "welcome message on main window")

In source code, each of the calls to a localized string can be refactored by adding an extension. Create a new file (e.g., ‘+Strings.swift’) for the project and add the following code:

extension String {
    var localized: String {
        return NSLocalizedString(self, comment: "")
    }
    func localized(comment: String = "") -> String {
        return NSLocalizedString(self, comment: comment)
    }
}

Now, a call for a localized string can be written in one of two easy-to-read forms depending on whether there is a comment:

title = "mainwindow.title.welcome".localized
subtitle = "mainwindow.subtitle.hobby".localized("name of app")

Commonality of Localization and Internationalization Resources:

Some of the localization and internationalization files can be shared as a common resource for Xcode projects involving both an iOS and a MacOS target: ‘Localizable.strings’, ‘InfoPlist.strings’, ‘Localizable.stringsdict’. To enable sharing, check the box next to each target under ‘Target Membership’ in the Xcode ‘Inspector Pane’ for each file.

Testing Localizations:

Manually selecting a language on an iPhone or iPad (e.g., Settings app > General > Languages & Region) is not conducive to testing a localized app in development for two reasons:

  • Lots of manual steps to change the language.
  • The language change affects all localizable apps on the device including all text within File >’Settings’ confounding the ability to make subsequent changes.

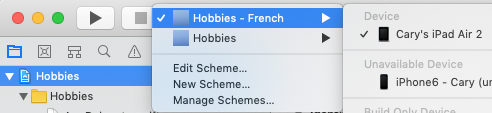
Creating language schemes that can be selected as part of the Xcode runtime configuration is a more versatile app testing approach that works with either the device simulator or an actual iPhone/iPad device seamlessly. There are at least three ways to access the screen to create a localized scheme:

  • From an Xcode shortcut key: ⌘ ⇧ <
  • From an Xcode toolbar: click on the app target, then select ‘Edit Scheme …‘ from the dropdown menu
  • From the Xcode menu: select ‘Product > Scheme > Edit Scheme …

scheme_01

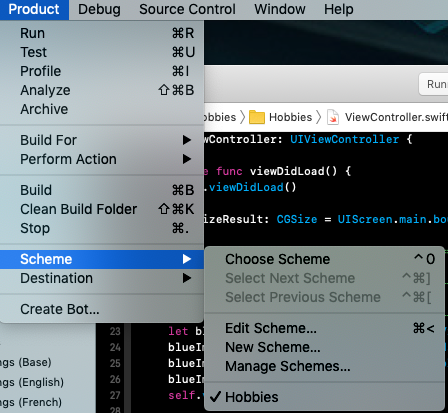
On the left side of the panel, select ‘Run‘ and select ‘Options‘ as shown.

schemes-system_01

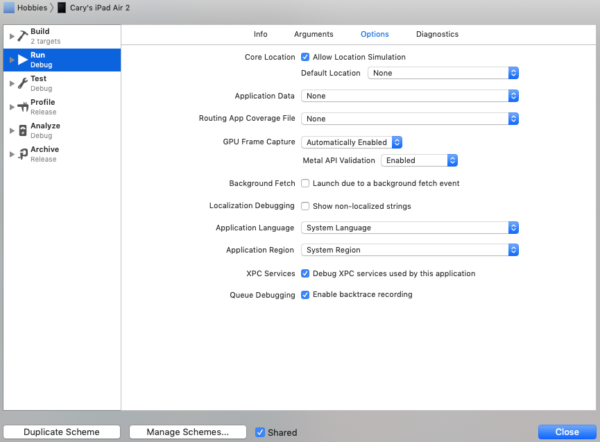
Select ‘Duplicate Scheme‘ and rename the scheme (i.e., top left corner). It is good practice to include the language in the scheme name. Then, select the application language (e.g., French) and application region for each localization scheme (e.g., France). Then, this scheme will override the current values in NSUserDefaults during app execution from Xcode. Selecting this scheme from the scheme list will change the localization for the app for testing without changing any other app’s localization on the actual device.

schemes-french_03

Summary:

To add localization and internationalization to an app takes extra effort and requires a healthy attention to detail. This post only touches on the first steps and doesn’t describe localizing date/time formats, plurals, number formats, currency formats, and getting language translations. And, that is why I identify with the following quote:

“Those who care enough to take the extra time to internationalize their app are very likely to be just as thoughtful when it comes to design and implementation.”

Matt Thompson

Reference Material:

Internationalization and Localization Guide

NSHipster: NSLocale

Internationalization – Right to Left Support for Mobile Apps

Where the &$!#% is localizable.strings?!?

New Localization Workflows in Xcode 10

Keeping dates local

Plurals localization using Stringsdict in iOS