Updated: June 2025
Overview:
Establishing and improving websites by Champlin Technologies LLC have been rewarding learning experiences. Specifically, this website has gone through a some major reincarnations using various web-dev tools and hosting webservers. The original website for Champlin Technologies LLC (2014) was dirt simple and hosted with a popular webhosting service that didn’t deliver on two important metrics: load-time (over 12 seconds for initial load time for home page) and up-time (down for several hours each month).
All our websites are currently hosted with Amazon Web Services (AWS) and have the following metrics:
As I can affirm, establishing a website on AWS EC2 can be a little intimidating at first to setup, configure, backup, and operate … even for people with good Linux and IT skills. Fortunately, effective help is just a few clicks away. This post is the first of a 6-post series with step-by-step procedures that I follow to setup WordPress on AWS for websites. As such, these posts provide a detailed procedure for me to reuse and for others to reference while creating their sites. As with all projects, I am an advocate of incremental testing – confirming success at intermediate points in a multiple-step complex process.
Note: The original version for this series was written in 2016 with EC2 servers running Ubuntu 16.04. This series has been completely updated in mid-2025. An example website, Seattle Hobbies, will be used throughout this series. The development of the Seattle Hobbies website assumes a simple low-maintenance website with low visitor count with no auto-scaling or redundancy. As such, implementation and configuration are easy. I will most likely seek the support of professional web-dev experts if I want to establish a more sophisticated website that handles commerce or has significant traffic with lots of site visitors.
Configuration Overview:
This example simple website will have the following configuration:
AWS Account:
If an AWS account needs to be established, then go to Amazon Web Services (AWS), click on ‘Sign in to the Console’, and follow the steps to create an account.
DNS Name Search and Purchase:
Each website has a name registered with DNS. And, this website is no different. Availability of website names makes the search and selection process a little challenging. ‘Route 53’ is the AWS service that allows for searching for an available website name from a DNS and purchasing it. The ‘Route 53’ service can be accessed from the AWS ‘Services’ on the top menu by clicking on ‘Route 53’ under ‘Networking & Content Delivery’. Select ‘Registered domains’ from the left column menu and then, click on ‘Register domain’ button.
At this point, enter the desired name for the website to check for its availability. For this series, the name ‘thehobbyapp.com’ was unavailable as shown below. However, the choice of ‘seattlehobbies.com’ was available. Add to cart, fill in contact info and purchase. I recommend turning on privacy protection during this step. Typically, it takes from 15 to 45 minutes for DNS to register the website name. In the meantime, an instance needs to be created.
Launching an AWS Ubuntu Instance:
To create a new instance, sign into AWS and click on ‘Services’ on the top menu, then click on ‘EC2’ located under ‘Compute’. Then click on ‘Instances’ from the left column on the EC2 Dashboard. To create a new instance, start by clicking on ‘Launch Instance’.


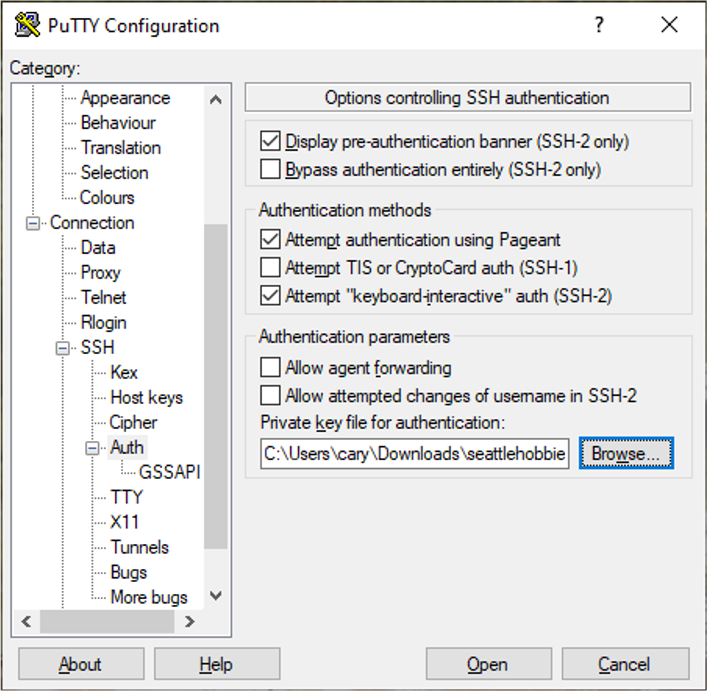
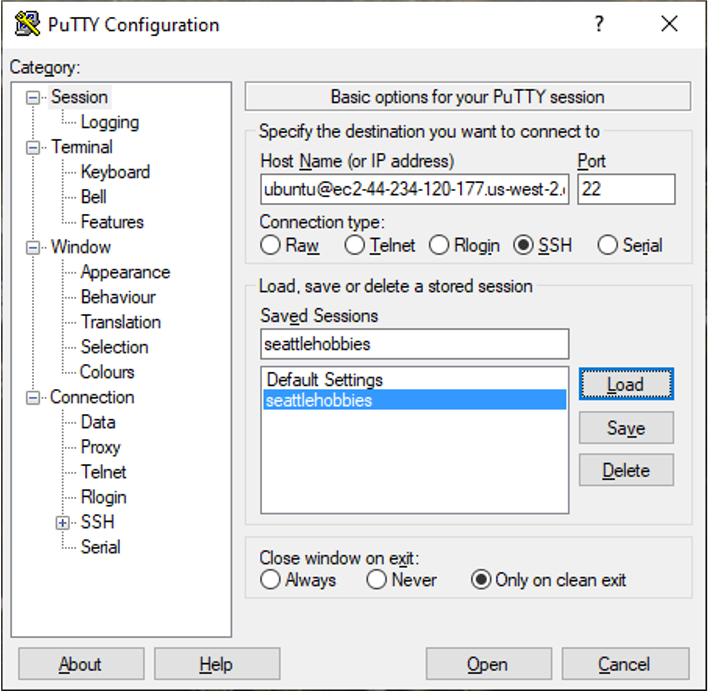
Accessing the AWS instance from a Windows PC is accomplished with a software program such as PuTTY. Here are the steps to install, generate a compatible private key file, configure settings, and connect to the AWS instance using PuTTY:
- Install: Download the 64-bit MSI installer from PuTTY. Windows will ask what to do with the file and ask again if you want to run the file. Select ‘Run’ each time and follow the prompts to install PuTTY.
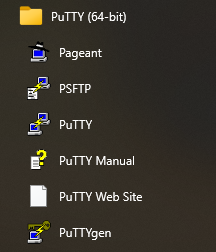
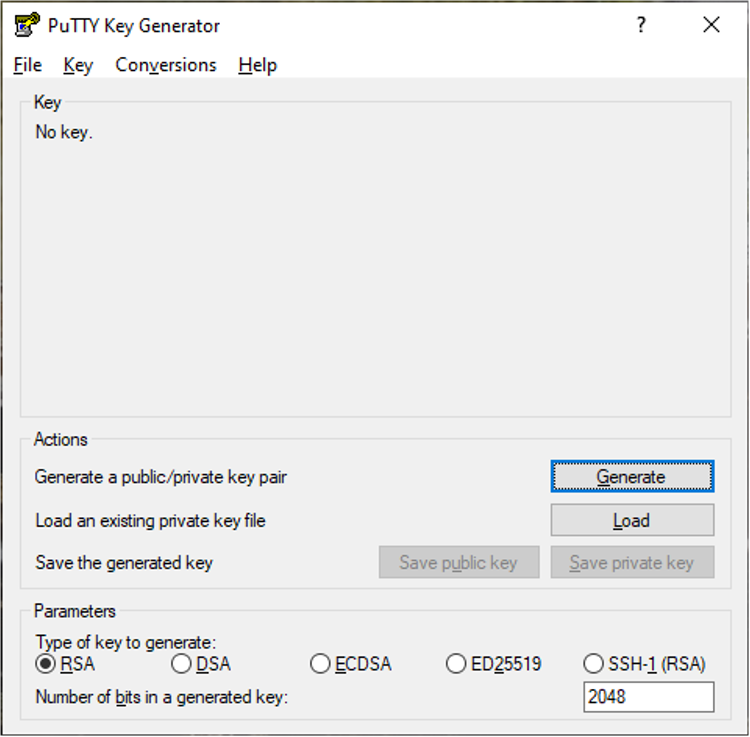
- Generate a compatible private key file: The private key file ‘seattlehobbies.pem‘ needs to be converted to a ‘*.ppk‘ by PuTTYgen. PuTTYgen is one of the software programs that was created during the installation process with PuTTY. Locate PuTTYgen in the Windows app menu as shown below and double-click to launch it.
Set the ‘Type of key to generate:‘ to RSA and the ‘Number of bits in a generated key:‘ to 2048 as shown in the following screenshot. Then, click on ‘Load‘ to load the recently downloaded private key file. Since the file type we are looking for is a ‘*.pem‘ file, select ‘All Files (*.*)‘ so that it will be visible. Then, go to the ‘Downloads’ folder and select ‘seattlehobbies.pem‘ and click ‘OK‘ on the displayed notice. Click ‘Save private key‘ and click ‘Yes‘ to confirm saving without a passphrase key. Then, save the ‘seattlehobbies.ppk‘ in the same folder as the ‘seattlehobbies.pem‘ file. Close ‘PuTTYgen‘ software program.
Setting up an Elastic IP Address:
An Elastic IP address (i.e., static public IP for the website) is needed to associate a website name via a DNS (domain name service). Click on the ‘Elastic IPs’ topic located on the left column of the EC2 dashboard. Then, click on ‘Allocate Elastic IP address’ button and confirm the allocation request by clicking on ‘Allocate’. An Elastic IP address is immediately allocated. Associate the Elastic IP address (e.g., 44.247.136.248) to the instance by selecting the address and select ‘Associate Elastic IP address’ from the ‘Actions’ pull-down menu. Click in the ‘Instance’ field, associate the instance (e.g., seattlehobbies), and click ‘Associate’. Click the ‘button’ to return to the EC2 dashboard.
At this point, a nice clean static IP address (e.g., 44.247.136.248) is our Seattle Hobbies instance’s IP address.
Associate an Elastic IP to DNS:
To associate an Elastic IP to the DNS website name, go back to AWS ‘Route 53’ service and click on ‘Hosted Zones’. Select the ‘Domain name’ corresponding to the website (e.g., ‘seattlehobbies’).
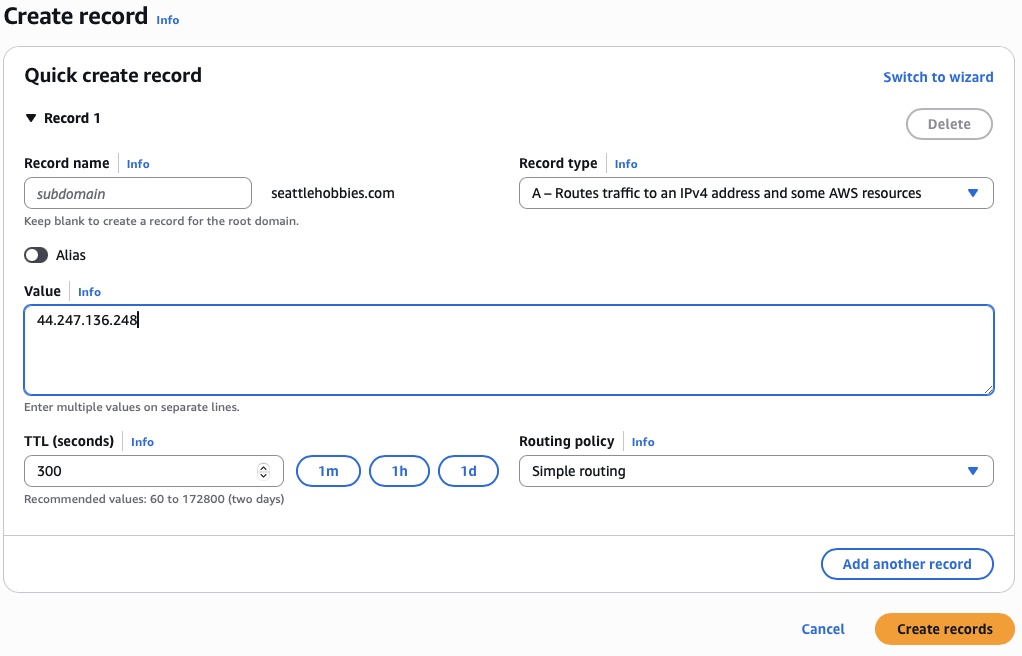
To associate an Elastic IP to the DNS website name, create an ‘A’ record for the hosted zone. Click on ‘Create record’, select ‘Simple routing’ from the array of choices’ under ‘Routing policy’. Leave ‘Record name’ subdomain blank. Under ‘Value’, enter the Elastic IP address (e.g., 44.247.136.248). Record type should be ‘A – Routes traffic to an IPv4 address and some AWS resources’. Click on ‘Create records’.
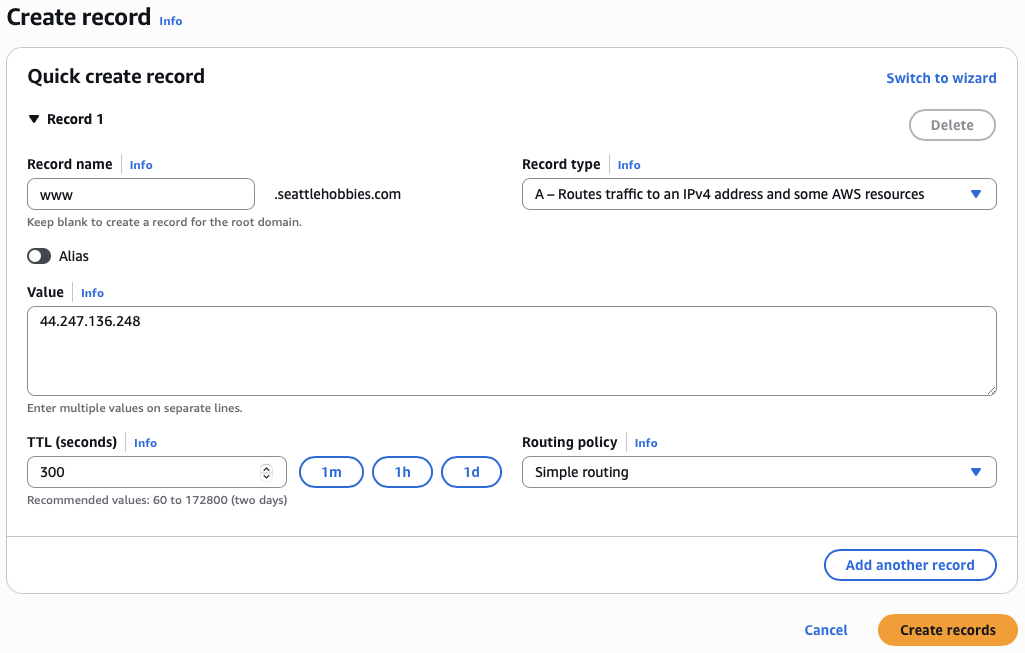
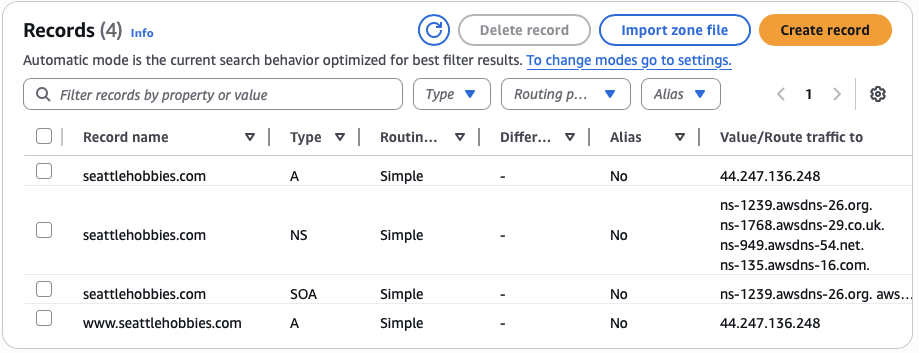
In addition, the Elastic IP needs to be associated with the ‘www’ sub-domain of the DNS website name. Repeat the steps above, but fill in ‘Record name’ with ‘www’ as shown in the screenshot below:
After both record are created, the records table should have entries similar to the table below:
It will take several minutes before the website names, records, and IP address are propagated through DNS.
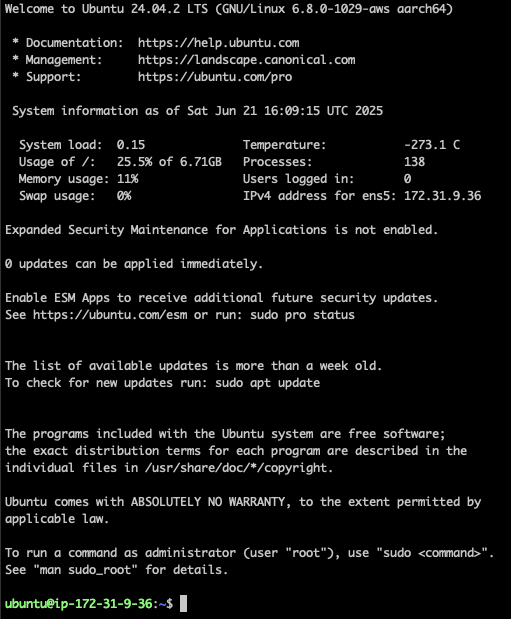
After the DNS website name is associated, the website name can replace the Elastic IP address in the SSH command line (Mac) or the IP address in PuTTY (Windows PC).
Since package updates to Ubuntu occur frequently, the initial Ubuntu 20.04 needs to process any updates. Follow the update steps listed in this blog post: A Collection of AWS EC2 Ubuntu Tips
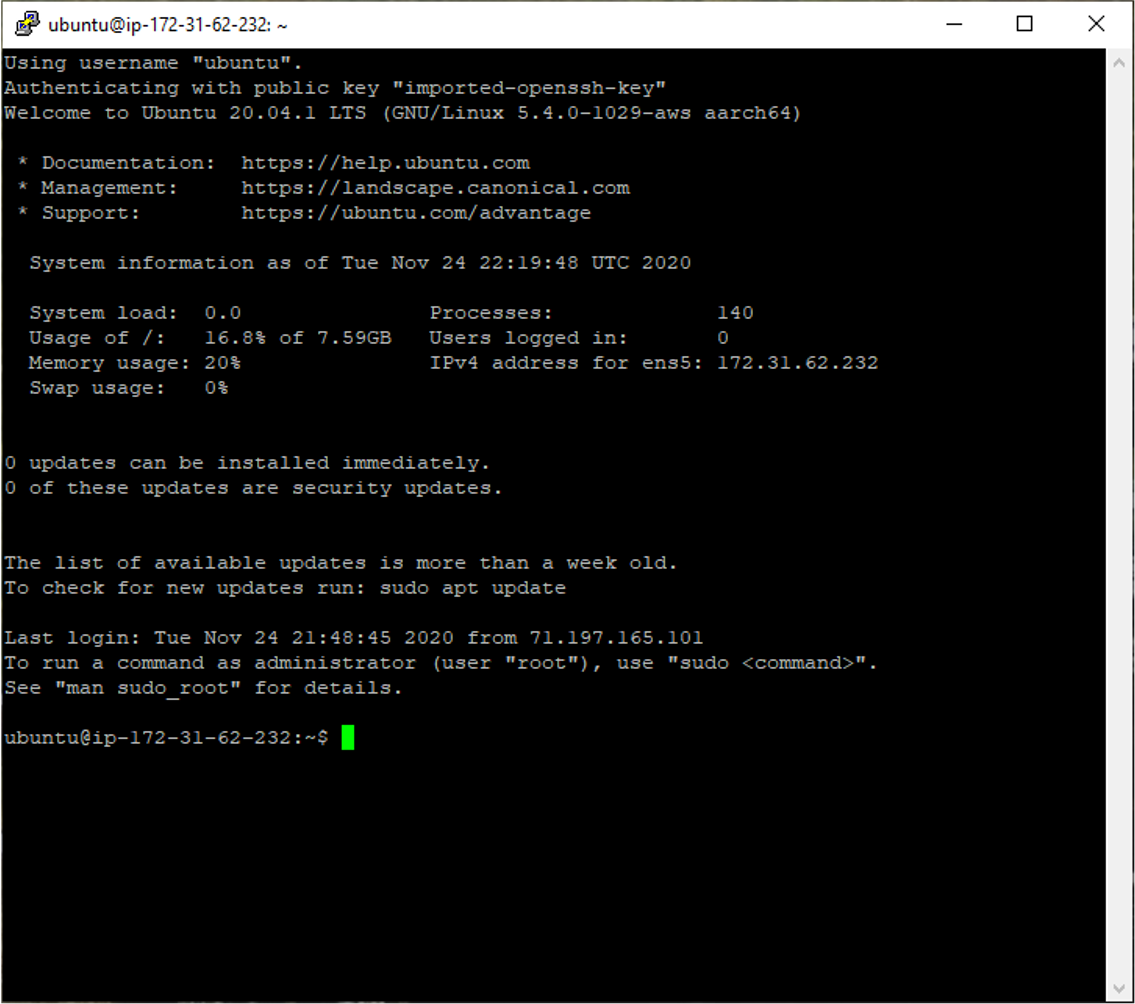
That’s it. A Linux instance has been established and SSH access works with the DNS website name ‘seattlehobbies.com’.