Overview
For app development on iOS, iPadOS, macOS and watchOS, Xcode is our world. Xcode has evolved significantly over the years. Although the Xcode tool and IDE are amazingly complex, it very effective at developing world-class apps for the iPhone and iPad families of devices, Mac, and Apple watch. As such, there are numerous Xcode tips and short-cuts that one learns along the path on the app development journey. Here is my growing list (updated: August 2021):
Showing/Hiding the Live Preview in Xcode
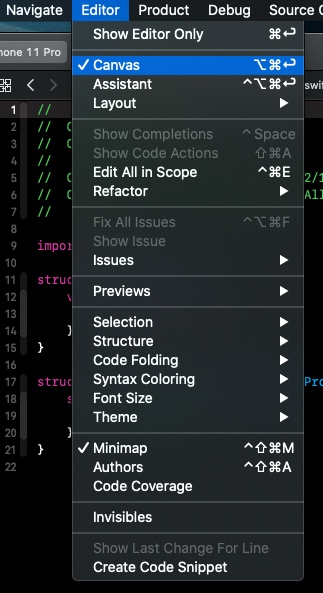
During UI development of an app, the Live Preview mode in Xcode is really handy since it updates in real-time. I really like its ability to display multiple device simulators allowing me to see various localized versions of the app’s UI simultaneously. However, there are times where it is more relevant to show additional editor panes during development. To turn the Live Preview functionality on or off, go to the Xcode menubar -> Editor and toggle the Canvas mode (Canvas is the name of the pane for Live Preview) or use the Xcode keyboard shortcut ⌥⌘↩︎ (i.e., option + command + return)) as shown in the following screenshot.
Using Inspector with SwiftUI in Xcode
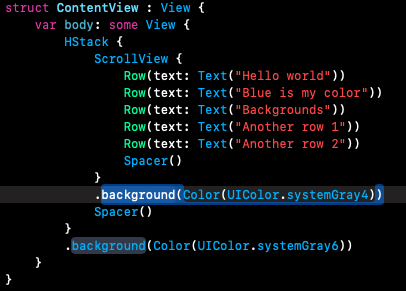
Within Xcode, there is an inspector menu within the code editor that can be used to set various modifiers for each SwiftUI view. To have access to the inspector menu, Xcode’s Canvas mode must be checked (i.e., Live Preview active and visible). With the cursor on either a view or a modifier, holding the Xcode keyboard shortcut ⌘ (i.e., command) highlights the view or modifier:
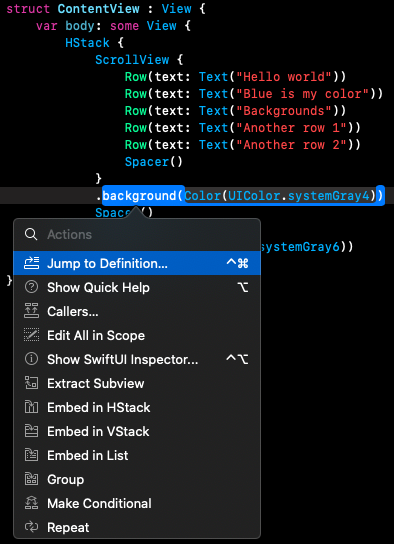
While holding the keyboard shortcut key ⌘, a touchpad click then shows a list of options that includes the inspector:
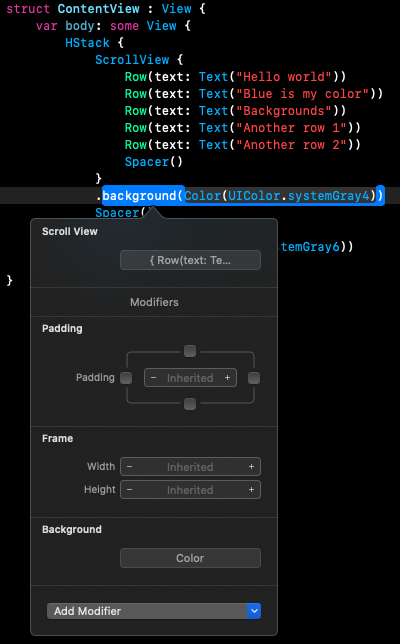
Clicking on the inspector option shows the following menu for adding modifiers:
Using Minimap in Xcode
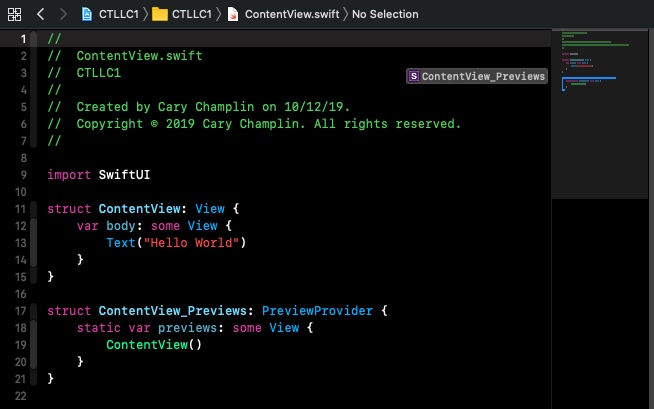
With Minimap, I am able to:
Uncabling the attached iPhone/iPad from Xcode
Wireless access to iOS devices isn’t only a time saver when switching between devices for testing a new build, but it reduces the number of cables attached to the suite of available ports on the Mac.
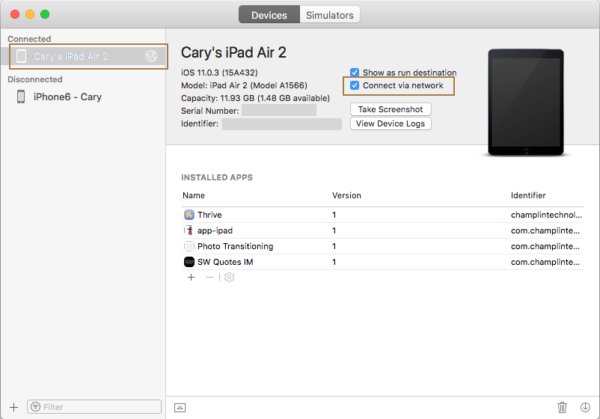
To enable this feature:
The annotated dialog box in the following screenshot shows the remaining steps left to do on Xcode:
At this point, Xcode will establish a wireless connection to the selected device. When the little internet symbol shows up next the connected device as shown in the dialog screenshot, then the device (e.g., iPad) can be unplugged. Xcode development now supports wireless development access to the selected device. Ths will be evident when selecting a device for build and run.
Accessing app ‘Documents’ folder and files on the iPhone/iPad
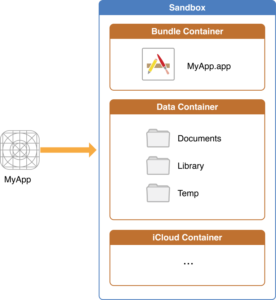
On iOS devices, an app’s folders and files are grouped into containers that resides in the app’s sandbox directory. The containers and folder/file arrangements are depicted in the following diagram (ref: Apple File System Programming Guide). During installation of a new app, these containers are created. The data container consists of a set of top-level folders that the app can use to organize user app data with subfolders and files.
Let’s assume the app you’re developing with Xcode writes a file to the ‘Documents‘ folder on an iPhone or iPad. How do you manually verify that a file was created within the ‘Documents‘ folder on an actual iOS device and that the contents are correct?
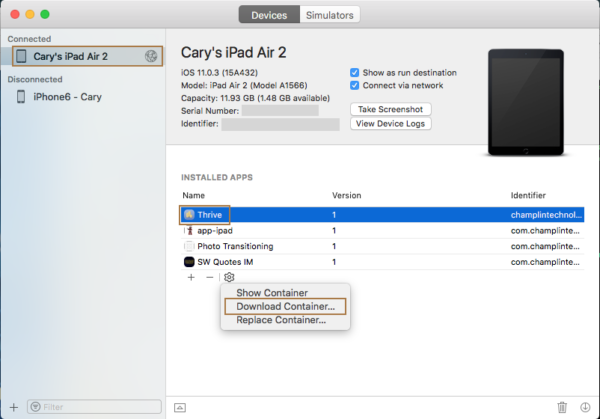
The ‘Documents‘ folder and files aren’t directly accessible from the Mac after a test run of an app during an Xcode session. The trick is to download the data container as part of an app package from the iOS device to some selected folder on the Mac.
Here are the steps using a recent example development app running on my iPad:
Open ‘Finder‘ and locate the folder containing the downloaded package (wrapper that includes the data container) that is identified by its rather long filename with a suffix ‘.xcappdata‘. An example screenshot of this package is shown.
Use a ‘2-finger tap‘ (or right click) on the filename and select ‘Show Package Contents‘ as shown in the following screenshot.
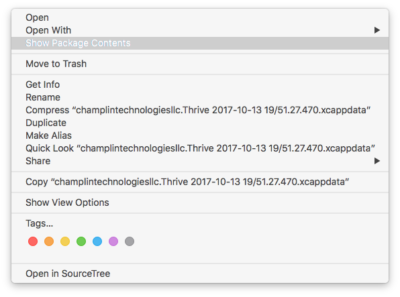
The ‘Finder‘ window now shows the containers with their folders and files similar to the following screenshot. Follow the path to the ‘Documents‘ folder where, in my case, sits a ‘sqlite‘ database file that was created by my simple example app. At this point, I copy this file out of the package to a separate folder to open and evaluate its contents.

In this specific case since I want to evaluate the contents of a ‘sqlite‘ database file, I use a downloaded Mac app, DB Browser for SQLite.
Accessing a Mac app’s Data Container folders and files on the Mac
On Mac computers, an app’s folders and files are grouped into containers that reside in the app’s sandbox. The containers and folder/file arrangements are depicted in the following diagram (ref: Apple File System Programming Guide). During installation of a new app, these containers are created. The data container consists of a set of top-level folders that the app can use to organize user app data with subfolders and files.

Let’s assume the Mac app you’re developing with Xcode creates a database file to the recommended subfolder ‘Library/Application Support‘ in the Data container. How do you manually verify that a file was created within the ‘Library/Application Support‘ folder on the Mac and examine the contents?
For development of a Mac app, these files are directly accessible from the Mac after a test run of a Mac dev app during an Xcode session. The trick is to know where to look. Here is the file path to the Application Support folder within the Data container (path is relative to your user folder) and the path will either include the App Bundle Identifier or the App’s Bundle Name. In the following path examples, com.champlintechnologiesllc.Thrive is the Xcode Bundle Identifier and Thrive is the Xcode Bundle Name. In your app project, look for your own app’s Bundle Identifier or Bundle Name in the Containers folder as you drill down:
./Library/Containers/com.champlintechnologiesllc.Thrive/Data/Library/ApplicationSupport
or
./Library/Containers/Thrive/Data/Library/ApplicationSupport
The following ‘Finder‘ screenshot shows the three ‘sqlite‘ database files. At this point, the files should be copied into another folder to evaluate its contents.
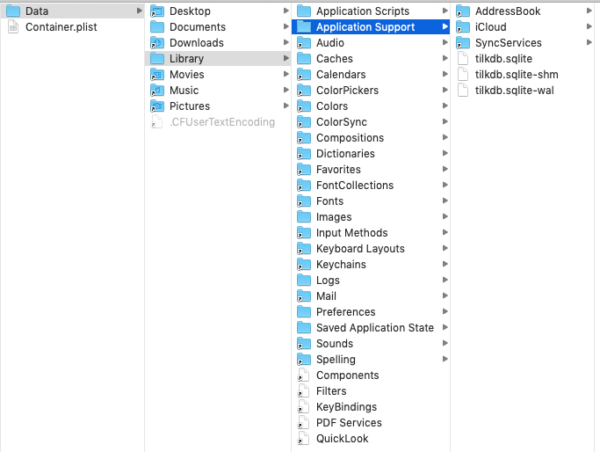
Since these are files associated with a ‘sqlite‘ database, I use a Mac app, DB Browser for SQLite to examine its contents.
Commenting out lines of code
Sometimes it is helpful to comment out a section of code as part of app development and debugging. Instead of typing ‘//‘ on every line of code to disable it in Xcode’s editor window, use ‘⌘/‘ (i.e., command + slash) to apply commenting prefixes ‘//‘ to several rows at the same time. It is a toggle keyboard shortcut, so highlighting commented rows and using ‘⌘/‘ will remove those commenting prefixes.
Moving lines of code around in a file
Sometimes I want to move code (a single line, a group of lines, or even an entire function) around within a file. There are two really nice keyboard shortcuts for doing this operation. Place the cursor on the line or highlight a group of lines of code. Press ⌥⌘[ (i.e., option + command + leftbracket) to move the selection up a line or ⌥⌘] (i.e., option + command + rightbracket) to move the selection down a line. And, if I want to increase or decrease the indentation for that highlighted code segment, the keyboard shortcuts are similar. Press ⌘[ (i.e., command + leftbracket) to outdent or ⌘] (i.e., command + rightbracket) to indent. Very handy!
Generating a UUID
In many computer applications, a UUID (universally unique identifier) provides a clean approach to uniquely identify items, such as database records.
As described in Wikipedia, the probability to find a duplicate within 103 trillion version-4 UUIDs is one in a billion. While the probability that a UUID will be duplicated for a particular application is not zero, it is so small to be negligible. As such, a UUID can be created and use it to identify items (e.g., database records) with near certainty that the UUID does not duplicate one that has already been, or will be, created.
On the MacOS, it is easy to generate a UUID using the following command in the MacOS terminal window:
uuidgen
Desktop Screens (Mission Control spaces)
Although not an Xcode productivity tip directly, being able to switch MacOS desktops (i.e., Mission Control) quickly and effortlessly on a MBP is handy since it is common to have several apps opened at the same time. Spreading their placement on multiple desktops brings organization to a workspace. Here are some tips for managing and accessing desktops on MacOS.
To show or hide the Mission Control spaces bar using the trackpad, swipe up with 3 or 4 fingers to show and down with 3 or 4 fingers to hide. Tap on an app or a Mission Control desktop to hide Mission Control. To show or hide Mission Control spaces bar using the keyboard, press ^↑ (i.e., control + up arrow) to show and ^↓ (i.e., control + down arrow) to hide.
To switch between Mission Control desktops using the trackpad, swipe left or right with 3 fingers. To switch between Mission Control desktops using the keyboard, press ^← (i.e., control + left arrow) or ^→ (i.e., control + right arrow).
Show/Hide Xcode Panels
Continuing with the same perspective on recovering screen space, Xcode provides some very handy keyboard shortcuts to control visibility of various Xcode panels. To show/hide the debug panel, toggle ⇧⌘Y (i.e., shift + command + Y). To show/hide the left navigator panel, toggle ⌘0 (i.e., command + zero). To show/hide the right navigator panel, toggle ⌥⌘0 (i.e., option + command + zero).
Other Tips
I will continue to add to this collection of Xcode tips as I discover them!
